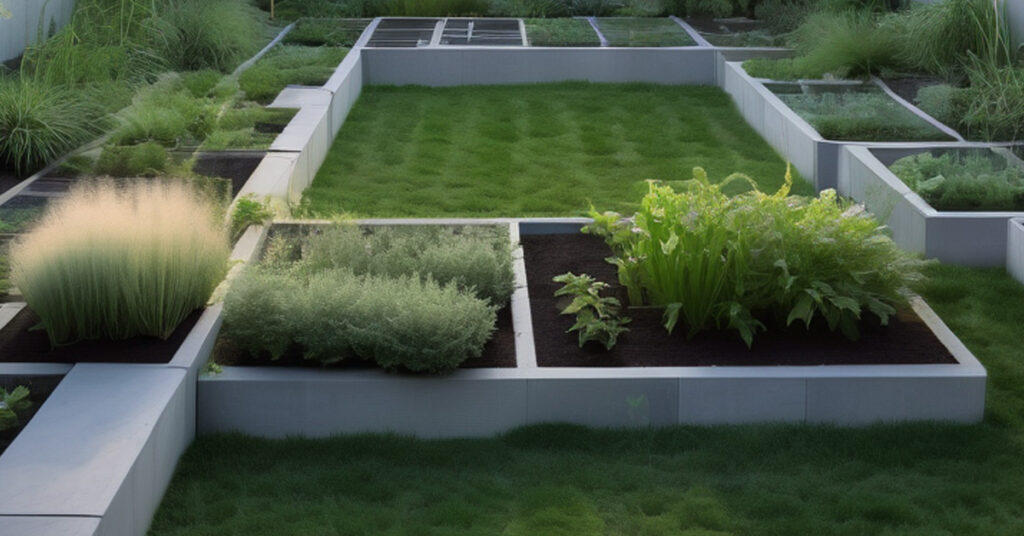
- Raised beds made of breeze blocks are an option for gardeners looking for a long-lasting and durable solution.
- These concrete blocks are easily available at home improvement stores like Home Depot and can be used to create attractive and functional raised beds in your garden.
- Breeze block raised beds offer excellent longevity and can withstand the elements for years to come.
- The design of breeze blocks allows for proper drainage, preventing waterlogging and ensuring the health of your plants.
- With the right tools and materials, constructing breeze block raised beds is a relatively easy DIY project that can transform your garden.
Breeze Blocks For Gardening
Creating a beautiful and functional garden is a dream for many homeowners. One way to achieve this is by constructing raised beds, which not only enhance the aesthetic appeal of your garden but also provide a convenient and efficient way to grow plants. While there are various materials available for building raised beds, one popular option is breeze blocks.
Breeze blocks, also known as concrete blocks, are versatile building materials that can be used for a wide range of construction projects. They are readily available at home improvement stores like Home Depot, making it easy to get started on your raised bed project. In this blog, we will explore the benefits of using breeze blocks for raised beds, the tools and materials you’ll need, and provide a step-by-step guide to constructing your own breeze block raised bed. We will also discuss tips for successful construction and provide recommendations for planting in your new raised bed.
Whether you’re a seasoned gardener or just starting out, breeze block raised beds are an excellent choice for creating a beautiful and productive garden. With their longevity, durability, and ease of construction, you’ll be able to enjoy the benefits of your raised bed for years to come.
Understanding Breeze Blocks
Before delving into the specifics of constructing breeze block raised beds, let’s take a moment to understand what breeze blocks are. Breeze blocks, also known as concrete blocks, are rectangular building blocks made from concrete. They have hollow cores, which makes them lightweight and easier to handle. Breeze blocks are commonly used in construction projects, but they also have applications in gardening.
You can find breeze blocks at home improvement stores like Home Depot, where they are readily available and affordable. They are a popular choice for building raised beds due to their durability and versatility. Whether you have a small garden area or a larger space, breeze blocks can be easily incorporated into your garden design.
What Are Breeze Blocks?
Breeze blocks, also known as concrete blocks, are rectangular building blocks made from concrete. They have hollow cores, which makes them lightweight and easier to handle. Breeze blocks are commonly used in various construction projects, from walls to foundations.
In the context of gardening, breeze blocks are a popular choice for building raised beds. They provide a sturdy and long-lasting structure that can withstand the elements. Breeze blocks are readily available at home improvement stores like Home Depot, making them easily accessible for DIY projects.
Whether you’re a seasoned gardener or a beginner, breeze blocks offer a practical and durable solution for creating raised beds in your garden. With their hollow cores, they also provide excellent drainage, ensuring the health of your plants. So, if you’re looking to enhance the aesthetic appeal of your garden and create a functional space for growing plants, consider using breeze blocks for your raised bed project.
Benefits of Using Breeze Blocks for Raised Beds
Using breeze blocks for raised beds offers several benefits that make them a popular choice among gardeners. One of the main advantages is their longevity. Breeze blocks are durable and can withstand the test of time, making them a great investment for your garden.
In addition to their longevity, breeze blocks provide excellent drainage for your raised bed. The hollow cores allow excess water to drain away, preventing waterlogging and ensuring the health of your plants. Proper drainage is crucial for the success of any garden bed, and breeze blocks offer a practical and effective solution.
Furthermore, breeze blocks are versatile and can be used to create various shapes and sizes of raised beds. Whether you prefer a traditional rectangular shape or something more unique, breeze blocks can be easily arranged to suit your design preferences.
Overall, using breeze blocks for raised beds offers a durable, long-lasting, and aesthetically pleasing solution for your garden. With their excellent drainage capabilities and easy availability, they are a popular choice for both experienced gardeners and beginners.
Building a Breeze Block Garden Bed Video
Preparing to Build Your Breeze Block Raised Bed
Before you start building your breeze block raised bed, there are a few things you need to consider. First, gather the necessary tools and materials. You will need a shovel, cement, rebar, and masonry tools for the construction process.
Next, choose the right location for your raised bed. Consider factors such as sunlight exposure, drainage, and accessibility. Ensure that the area is level and free from obstructions.
Once you have gathered the tools and chosen the location, you’re ready to start building your breeze block raised bed. Follow the step-by-step guide below to construct your raised bed.
Tools and Materials Needed
To build your breeze block raised bed, you will need the following tools and materials:
- Shovel: For digging the ground and preparing the site for your raised bed.
- Cement: To hold the breeze blocks together and create a strong structure.
- Rebar: Optional reinforcement for added stability in larger raised beds.
- Masonry tools: Such as a trowel and mallet, for cutting blocks and applying mortar.
In addition to these tools, you will also need the breeze blocks themselves. The number of blocks required will depend on the size and height of your raised bed.
Remember to gather all the necessary tools and materials before starting the construction process to ensure a smooth and efficient build.
Choosing the Right Location
Choosing the right location for your breeze block raised bed is essential for the success of your garden. Consider the following factors when selecting a spot:
- Garden area: Assess the available space in your garden and choose an area that can accommodate the size of the raised bed you have in mind.
- Sunlight exposure: Ensure that the location receives adequate sunlight for the plants you intend to grow. Most vegetables and flowers thrive in full sun, so choose a spot that gets at least 6-8 hours of direct sunlight per day.
- Drainage: Avoid areas that are prone to waterlogging or have poor drainage. Excess water can lead to root rot and other plant diseases. Look for a spot with good natural drainage or consider adding gravel or other drainage materials to the bottom of the raised bed.
By considering these factors, you can select a location that provides optimal growing conditions for your plants and ensures the success of your breeze block raised bed.
Step-by-Step Guide to Constructing Your Raised Bed
Now that you have gathered the necessary tools and materials and chosen the right location, it’s time to start constructing your breeze block raised bed. Follow this step-by-step guide for a successful build:
- Step 1: Designing Your Raised Bed Layout: Determine the desired shape and size of your raised bed. You can find inspiration on websites like Pinterest or create your own unique design.
- Step 2: Preparing the Ground: Clear the site of any debris and level the ground. Use a shovel and rake to remove any weeds or rocks that may interfere with the placement of the breeze blocks.
- Step 3: Laying the First Layer of Breeze Blocks: Start by laying the first layer of breeze blocks, making sure they are level and aligned. Use a rubber mallet to tap the blocks into place.
- Step 4: Checking for Level and Adjustments: Use a level to check if the blocks are level and make any necessary adjustments. This step is essential for the stability and aesthetics of your raised bed.
- Step 5: Completing the Breeze Block Layers: Continue laying additional layers of breeze blocks, alternating the orientation of the blocks to create a sturdy structure. Apply mortar between the blocks to secure them in place.
- Step 6: Securing the Blocks and Final Touches: Once all the layers are in place, secure the blocks with mortar and allow it to dry. You can also apply a second coat of render for a smoother finish. Consider adding landscaping fabric to the inside of the bed to prevent weeds from growing.
By following these steps, you will be able to construct a sturdy and visually appealing breeze block raised bed in your garden.
Step 1: Designing Your Raised Bed Layout
Before you start building your breeze block raised bed, it’s important to plan out the layout and design. Determine the desired shape and size of your raised bed based on the available space in your garden and your gardening needs. You can find inspiration for different bed shapes on websites like Pinterest or create your own unique design.
Consider factors such as accessibility and aesthetics when choosing the shape of your raised bed. Rectangular or square beds are popular choices due to their simplicity and ease of construction. However, you can also explore more creative options, such as curved or tiered beds.
By planning out the layout beforehand, you can ensure that your raised bed fits seamlessly into your garden and meets your gardening requirements.
Step 2: Preparing the Ground
Once you have designed the layout for your breeze block raised bed, it’s time to prepare the ground. Clear the site of any debris, weeds, or rocks that may interfere with the placement of the breeze blocks. Use a shovel to dig up the area and remove any existing vegetation.
After clearing the ground, use a rake to level the soil and create a smooth surface for your raised bed. This step is important for the stability and aesthetics of your raised bed.
If necessary, you can also consider adding a layer of hardcore or MOT (Ministry of Transport) type 1 to the ground to improve drainage and create a stable base for your raised bed. Spread a layer of MOT evenly over the entire area and compact it using a plate compactor or by walking over it.
By properly preparing the ground, you will ensure a solid foundation for your breeze block raised bed.
Step 3: Laying the First Layer of Breeze Blocks
Start by placing the concrete blocks along the bed shape you’ve outlined. Ensure they are level and aligned correctly. For curved edges, cutting blocks may be necessary. Use a rubber mallet to adjust block placement gently. Building the first layer is crucial for the bed’s stability. Consider using mortar to secure the blocks further if needed. This step forms the foundation of your raised bed and sets the tone for the whole construction process.
Step 4: Checking for Level and Adjustments
Step 4 involves ensuring your breeze block raised bed is level by using a spirit level. Check each block’s position meticulously to guarantee a stable structure. Make adjustments as needed, tapping blocks gently with a rubber mallet to align them perfectly. This step is crucial for the stability and longevity of your raised bed. Additionally, verify that the corners are square by measuring diagonally. Taking time to check for level and make adjustments now will pay off in the long run with a well-aligned and sturdy raised bed.
Step 5: Completing the Breeze Block Layers
To complete the breeze block layers, ensure each block is level and aligned. Apply mortar to the top of the first layer before placing the second layer. Use a rubber mallet to gently tap the blocks into position. Check for any imperfections or unevenness as you progress. Continue this process until reaching the desired height for your raised bed. Lastly, let the mortar cure before proceeding to the next step, ensuring the stability and longevity of your construction.
Step 6: Securing the Blocks and Final Touches
To secure your breeze block raised bed, apply a second coat of render to the blocks for a polished look. Using exterior paint or masonry paint can add durability and a touch of color. Once the blocks are fixed in place, ensure they are level with a rubber mallet. To provide longevity, consider adding a fencing perimeter or landscaping fabric inside the bed. Completing the final touches such as adding curved edges or decorative gravel enhances both the aesthetic appeal and structural integrity of your raised bed.
Tips for Successful Breeze Block Construction
When working on breeze block construction, ensure proper drainage to prevent water accumulation which can impact plant growth. Consider adding aesthetic enhancements to beautify the garden area. Checking the level and making adjustments as needed during construction is essential. To boost longevity, complete the second coat of render and masonry paint on your raised bed. For added stability, secure the blocks using a rubber mallet and rebar. Pay attention to details like curved edges and landscaping fabric for a polished finish.
Ensuring Proper Drainage
To ensure proper drainage in your breeze block raised beds, consider adding a layer of gravel at the bottom before filling with soil to prevent waterlogging. Installing perforated drainage pipes can also help excess water escape, promoting healthy root growth. Additionally, lining the inside of the bed with landscaping fabric can aid in water drainage while preventing soil erosion. Proper drainage is key to maintaining the longevity and health of your plants in the raised bed.
Aesthetic Enhancements
For aesthetic enhancements, consider painting your breeze blocks to match your garden’s theme. Using exterior paint or masonry paint can give a polished look. You can also create curved edges for a softer appearance. Incorporating landscaping fabric inside the bed can help maintain a tidy look and prevent weed growth. Adding fencing or gravel around the perimeter can further enhance the visual appeal. These small touches can elevate the overall look of your breeze block raised bed, blending it seamlessly into your garden area.
Planting in Your New Raised Bed
Selecting the right plants for your breeze block raised bed is crucial. Opt for varieties that thrive in deep soil beds, such as tomatoes, peppers, and herbs. Ensure the soil is rich and well-draining by mixing in compost or fertilizer. Consider layering landscaping fabric at the bottom to prevent weeds. Follow planting guidelines for spacing and depth, and water thoroughly after planting. Monitor your plants’ growth and provide necessary support as they flourish in your newly constructed raised bed.
Best Plants for Breeze Block Raised Beds
Amidst the solidity of concrete blocks, consider planting vibrant flowers like marigolds or petunias to soften the industrial look. Vegetables such as tomatoes, peppers, or herbs like rosemary thrive in this setup. The sturdiness of the blocks accommodates the weight of fruits and vegetables in the garden bed. Additionally, climbing plants like peas or beans can latch onto the blockwork for support, adding a vertical dimension to your garden space. Selecting plants that complement the robustness of breeze block structures ensures a harmonious and fruitful garden bed.
Soil and Compost Recommendations
For optimal plant growth, choose loam mixed with compost for your breeze block raised bed. This blend provides essential nutrients and moisture retention. Mix in organic fertilizers for added nourishment. Avoid using solely topsoil, as it may lack nutrients necessary for plant growth in a confined space. Consider layering cardboard at the base for weed suppression. This combination ensures a fertile environment for your plants to thrive. Prepare your soil mix diligently before planting to set a solid foundation for your gardening venture.
Conclusion
In conclusion, constructing breeze block raised beds is a practical and visually appealing way to enhance your gardening experience. By following the step-by-step guide and ensuring proper drainage, you can create a sturdy and long-lasting raised bed. Consider the aesthetic enhancements and choose suitable plants to thrive in this setup. Whether you are a beginner or an experienced gardener, breeze block raised beds offer a versatile solution for growing your favorite plants. Start your gardening project today and enjoy the benefits of these functional and stylish raised beds.